Categories: Protek 608 Digital Multimeter
Tags: connectivity development java rs-232 software
Posted by: Darian Cabot
Comments:2
Protek 608 protocol details

This post is a continuation of the Protek 608 DMM software project.
As detailed in a previous post, the physical communications layer is RS-232 – 9600 baud, 7, N, 1. So we know how to correctly connect the the multimeter and handle the data transfer, but how is the data interpreted? What’s the language or meaning? In this post I detail all of this, starting with the packet structure, then I’ll explain how to make sense of all the bits and bytes.
Packet framing
The first thing we should do is understand how the packets are framed. This means determining the start and end of each packet. Making a mistake here would lead to framing errors, and basically everything else will fail. Luckily the Protek 608 protocol makes framing very easy.
Data is sent from the multimeter in fixed length packets. There is no CR or LF packet termination (common for RS-232 protocols), but instead each packet begins with a ‘[‘ (open square bracket character) and ends with a ‘]’ (close square bracket character). The ‘[‘ character is 5b in hex, and ‘]’ is 5d. So if we watch for these, and assuming 5b or 5d aren’t used in the data, we’re set.
But it gets better! Each packet is a set length of 43 bytes.
That means each packet will look like this:
[5b] [ 41-bytes of data ] [5d]
Now in the software I can watch for the start character, count the number of data bytes, then check for the end character. If I see this as expected, I know the packet is valid, and we can decode it.
Sample packet
Here’s a real packet I captured from the DMM. I’ve added the line breaks for easy viewing. Notice the first and last characters?
 5b 0d 0f 05 00 00 00 00
 00 01 02 08 0f 0d 0f 05
 0f 05 00 0c 00 00 00 00
 05 0b 06 00 00 02 00 00
 00 00 08 04 00 05 0f 06
 0b 00 5d
If you have a sharp eye, you may have noticed something else in common with all of the 41 data bytes. Only the last 4 bits (nibble) is used! The first 4 bits are always zero. This is good because the start and end characters will always be unique (i.e. we shouldn’t get any false positives when framing the packet).
So if we discard the first nibble of each byte we are left with 164 relevant bits instead of the full 287 received.
Here they are, in both hex and binary:
      df       50       00       00
11011111 01010000 00000000 00000000

      12       8f       df       5f
00010010 10001111 11011111 01011111

      50       c0       00       05
01010000 11000000 00000000 00000101

      b6       00       20       00
10110110 00000000 00100000 00000000

      08       40       5f       6b
00001000 01000000 01011111 01101011

   0
0000
Alrighty! So we have our packet of data, we’re framing it effectively, we’ve discarded the overhead, now what does it all mean?
Making sense of the data
According the page 44 and 45 of the manual (Dropbox link), each bit represents a segment on the DMM’s display:
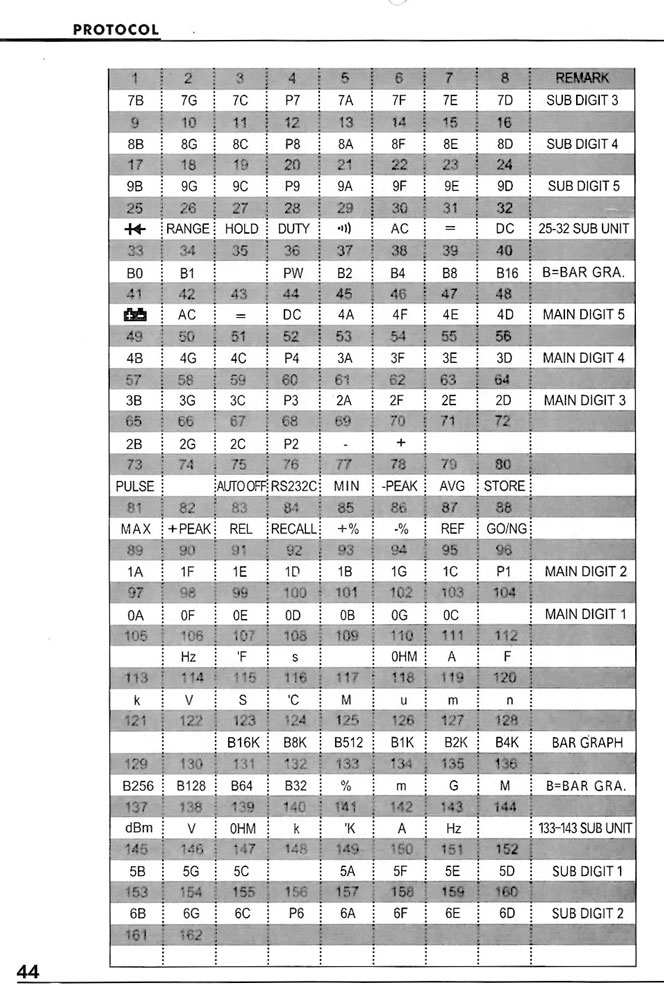
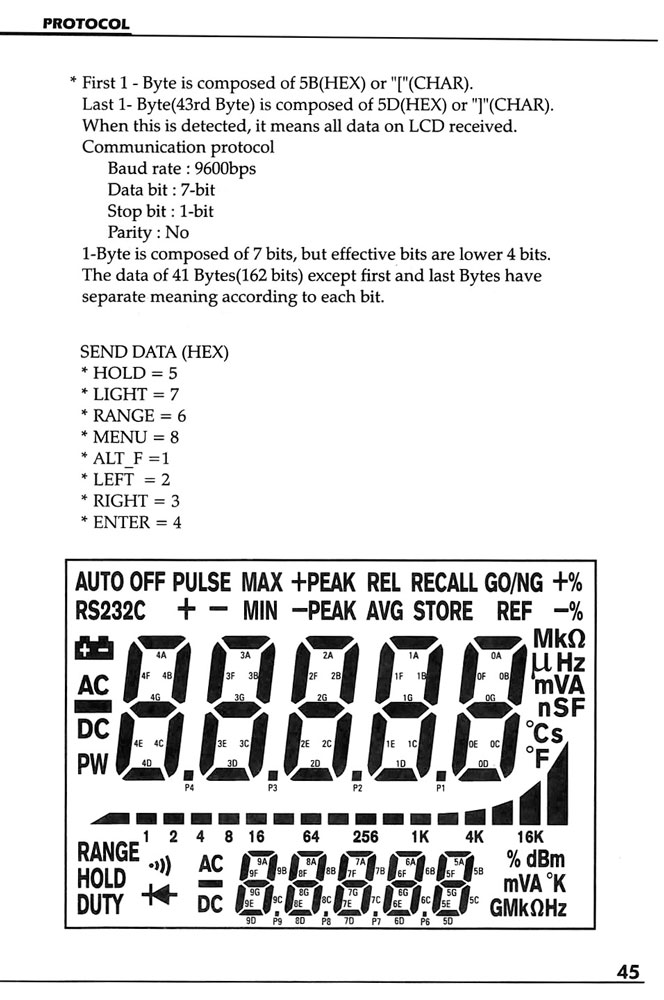
This is interesting because we aren’t receiving any numerical values, but rather a graphical representation of them. Here’s an example of how the LCD segments correlate to bits in the protocol:

This means we have some extra work to do to get the values. This will involve bit masking, etc., Well get into that more in the next blog post.
Another trick to keep in mind. The bits are read in 4-bit nibbles from right to left! For example, the first 2 nibbles:
1101 1111
Are actually reference to the manual like this:
1011 1111
So, each 8-bit byte we have (above) is represented on page 44 by the grey rows. When a bit is set, then the correlated ‘flag’ or LCD segment is active.
From here developing the software to read this is quite straightforward. Also, if you look on page 45 there are some basic commands we can write too. In my next post I’ll explain how I created a Java library that communicates with the Protek 608.
Hardware and software engineer with experience in product development and building automation. Director at Cabot Technologies and Product Manager at NEX Data Management Systems.


2 comments
[…] A detailed look at how the Protek 608 protocol works […]
[…] have previously developed Java libraries for test equipment (see Protek 608, for example). I like developing my own software, especially in Java, as it’s cross-platform […]