DIY 3D printing filament dryer
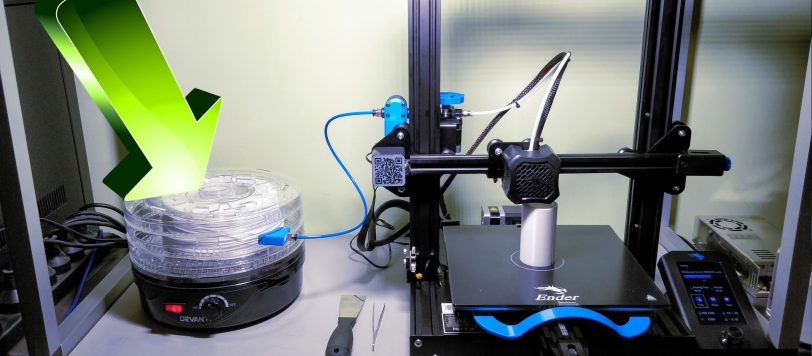
How I built a DIY filament dryer from an inexpensive food dehydrator for my Creality Ender 3 V2 3D printer. This houses a standard 1kg spool of filament, allows printing directly from the dryer, and improves print quality and consistency.
Why dry filament?
I live in a sub-tropical climate which means typically high humidity for much of the year. Many filaments are prone to absorbing moisture from the air which causes issues with print quality and consistency. When printing with PLA, I had issues with stringing where the filament wouldn’t break cleanly but instead string across the print like spider webs.
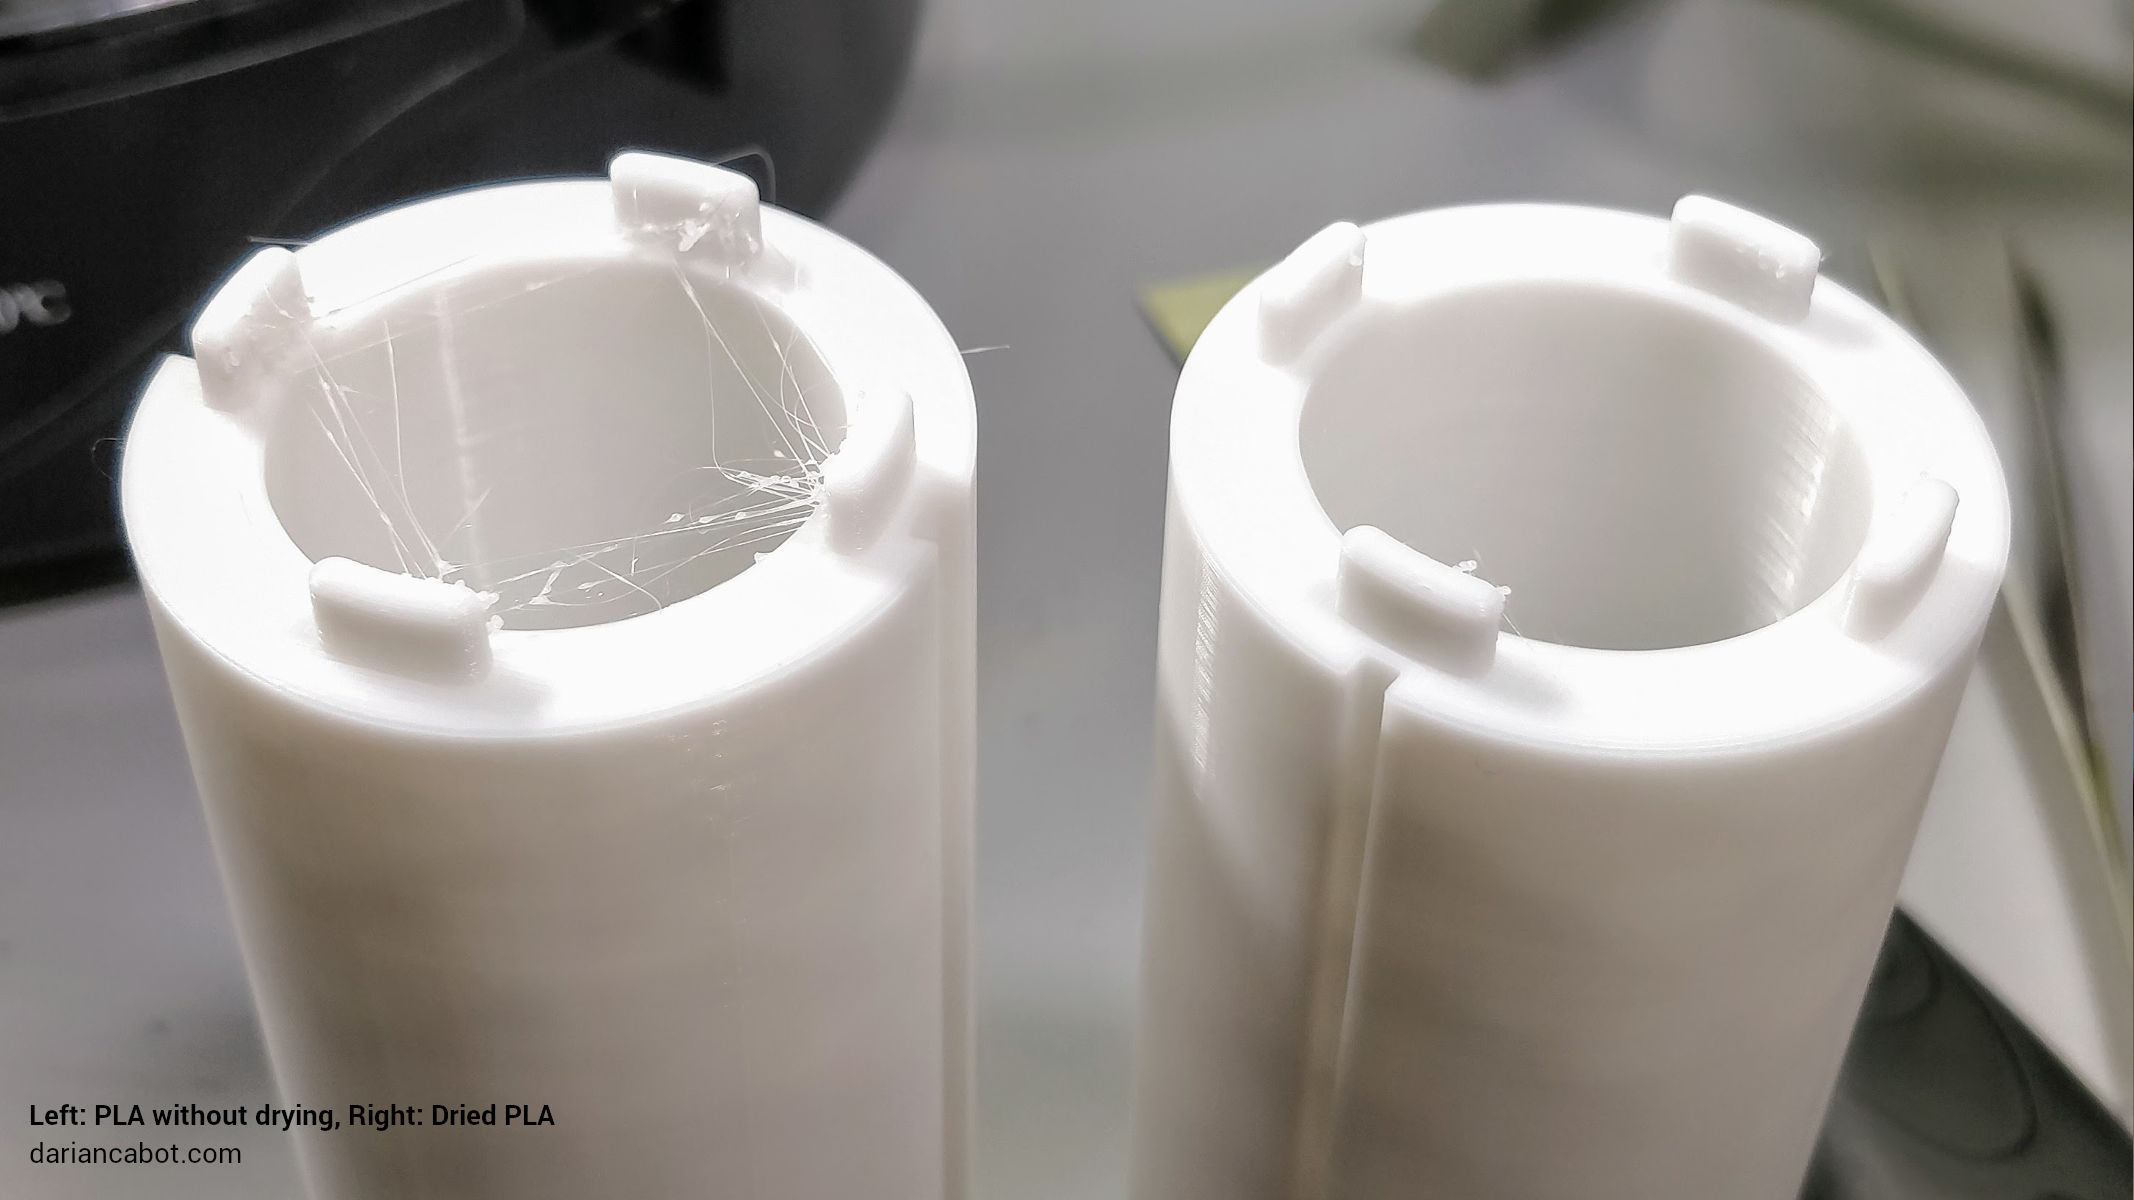
The dried filament shows much less stringing and a cleaner finish.
I also wanted to position the filament spool next to the printer, not on top as is typical. This is more convenient for changing filament but can also help to reduce ghosting artefacts in the prints.
Build instructions
What you’ll need
- A food dehydrator – I purchased a Devanti 5 try food dehydrator (model: FD-BT5-1142-BK) for $55 on eBay.
- A PTFE bowden tube and PC4-M10 fitting – I purchased this for $15 on eBay.
- Tools for cutting the plastic trays – Strong side-cutters, assortment of files, or a Dremel.
- A 3D printed adaptor to connect the PTFE tube neatly to the side of the deydrator. I have made this part available on Thingiverse.
Step-by-step instructions

Step 1 – Print the adaptor
Download the adaptor from Thingiverse and start that printing. I used 0.12mm layer height, 50% infill, and no supports or rafts.
Step 2 – Modify the food dehydrator trays
The food dehydrator will come with 5 trays and a lid. We only need 3 trays for a standard 1kg filament spool, so put 2 trays aside.
1 of the 3 trays will be used as the base to hold the spool. This can be placed on the dehydrator base, no modification necessary. The trays have a raised circle in the middle that conveniently holds the spool and allows it to turn easily.
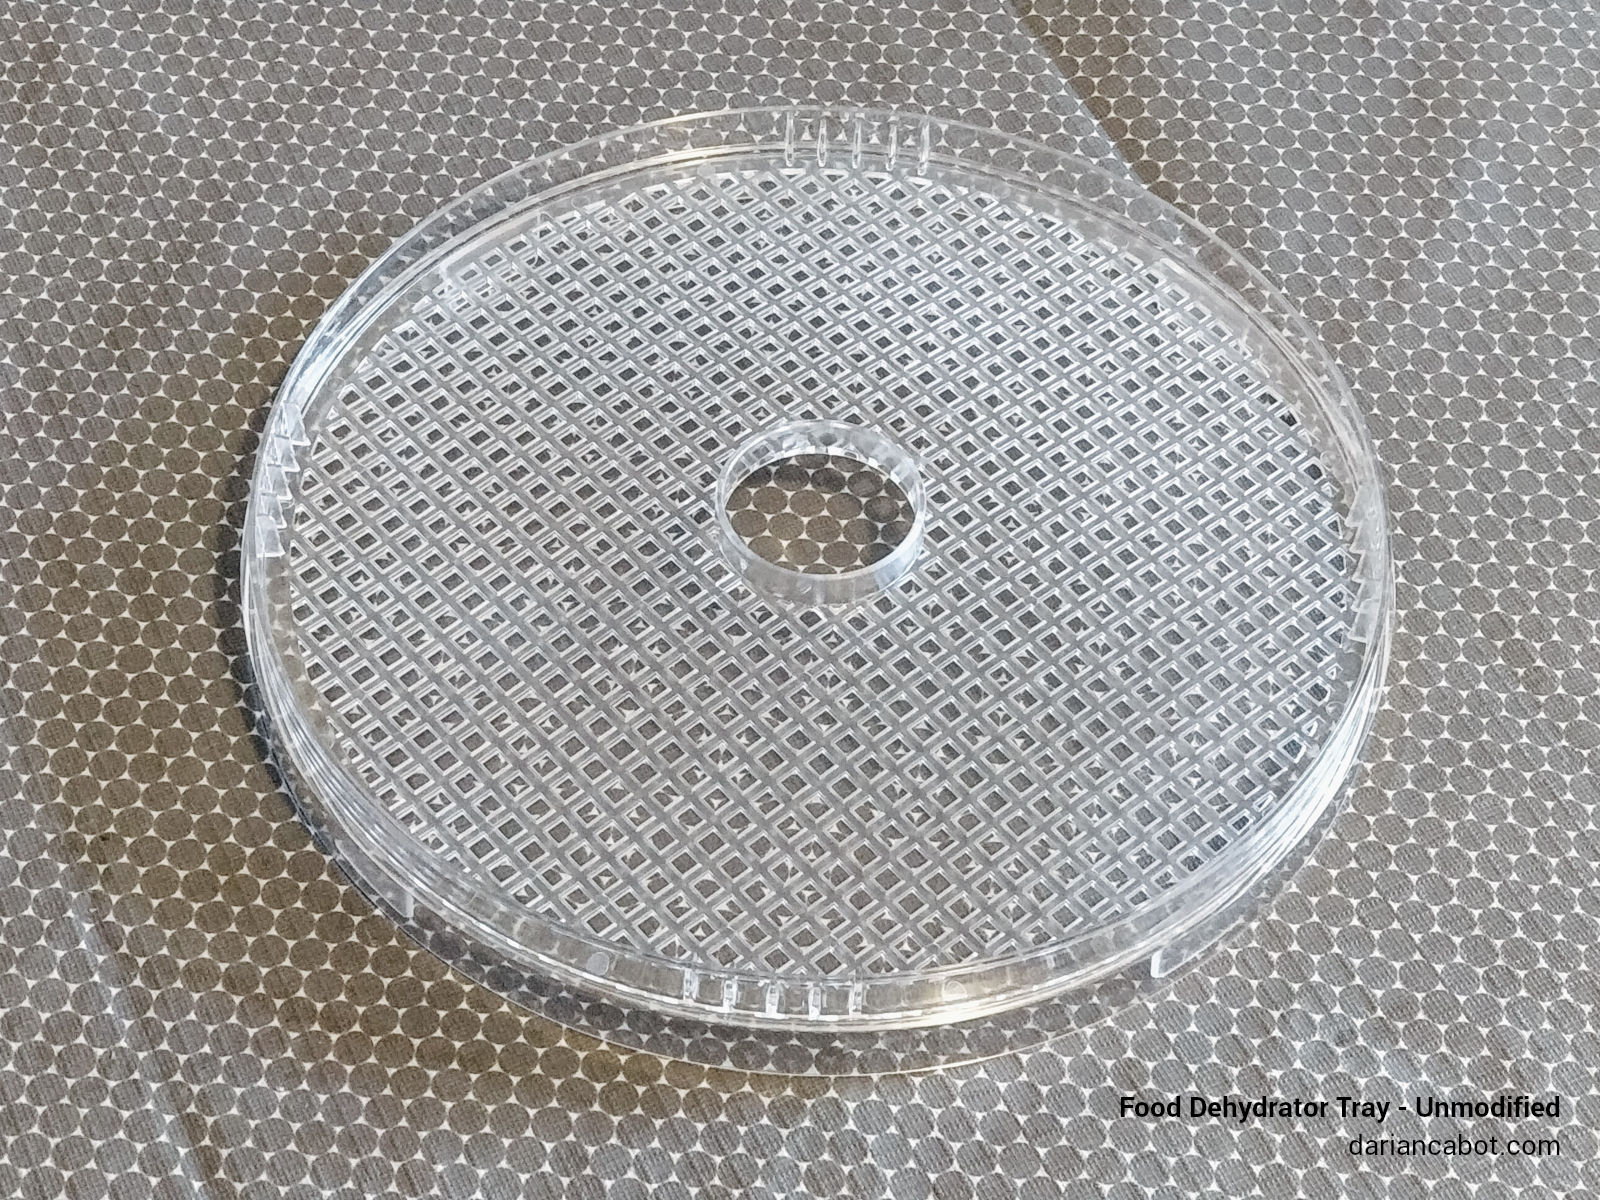
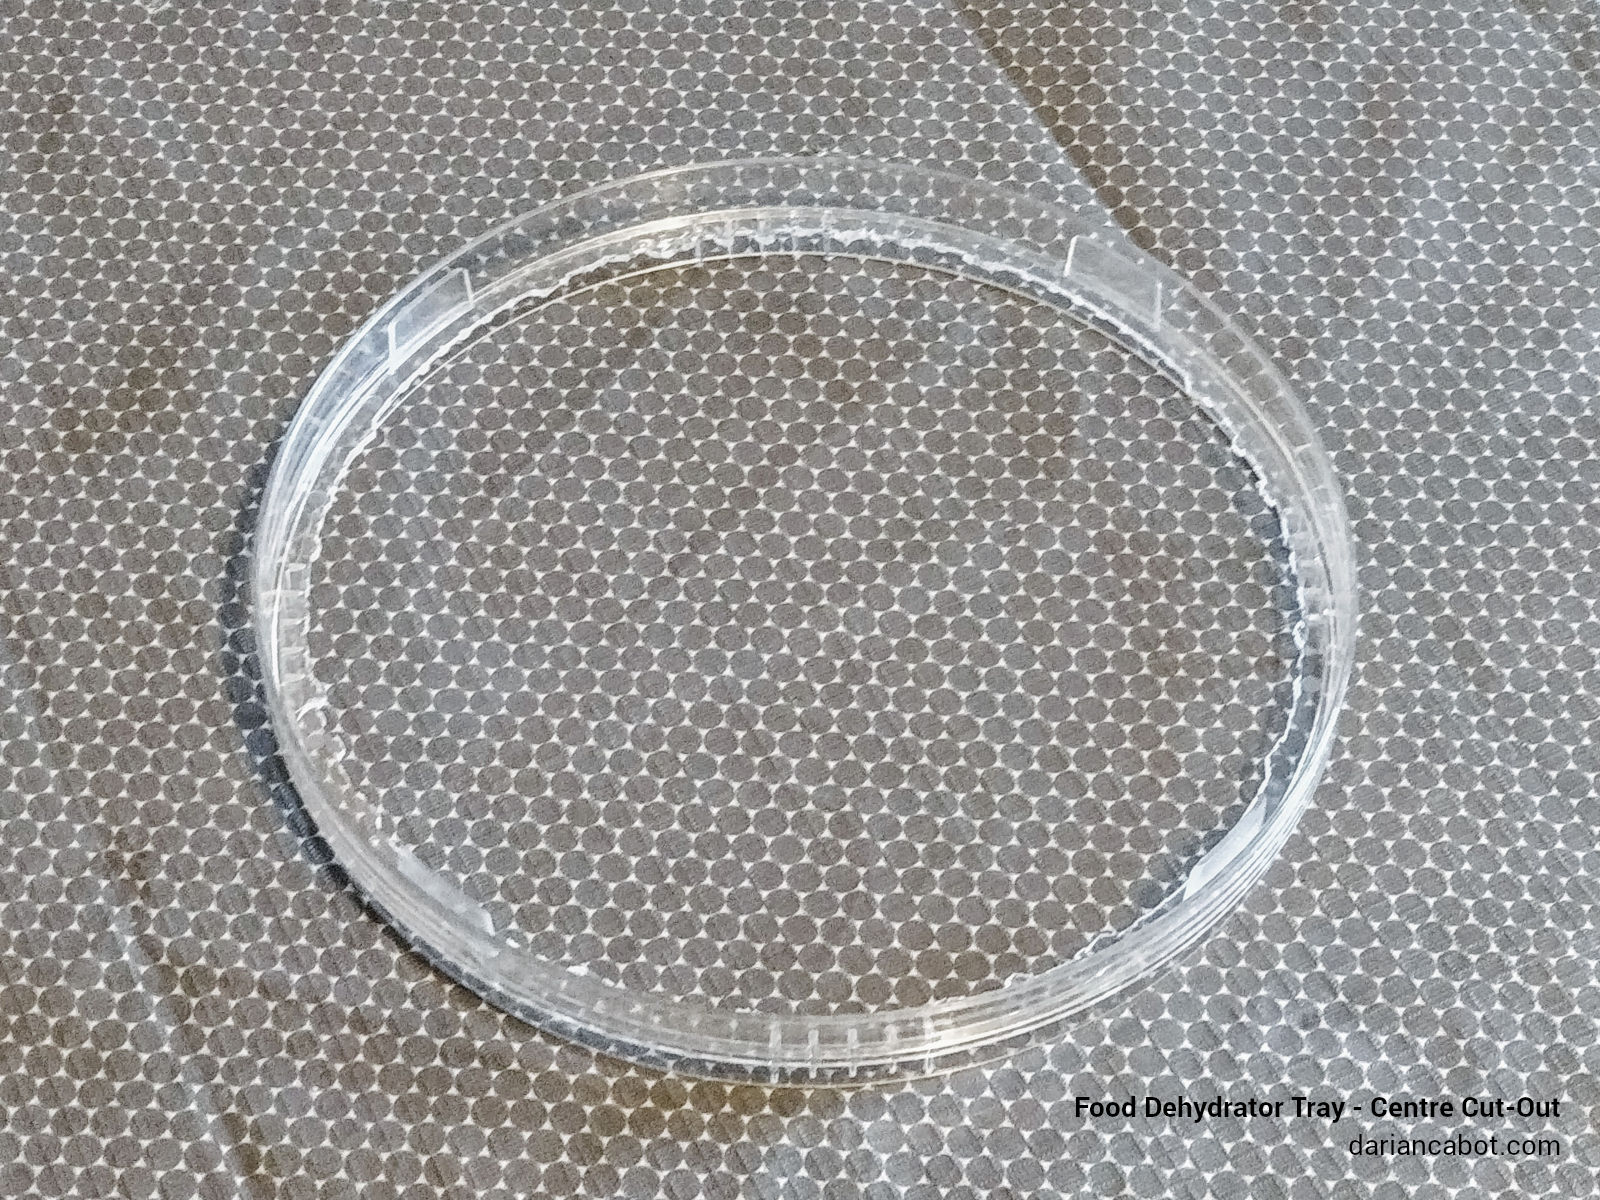
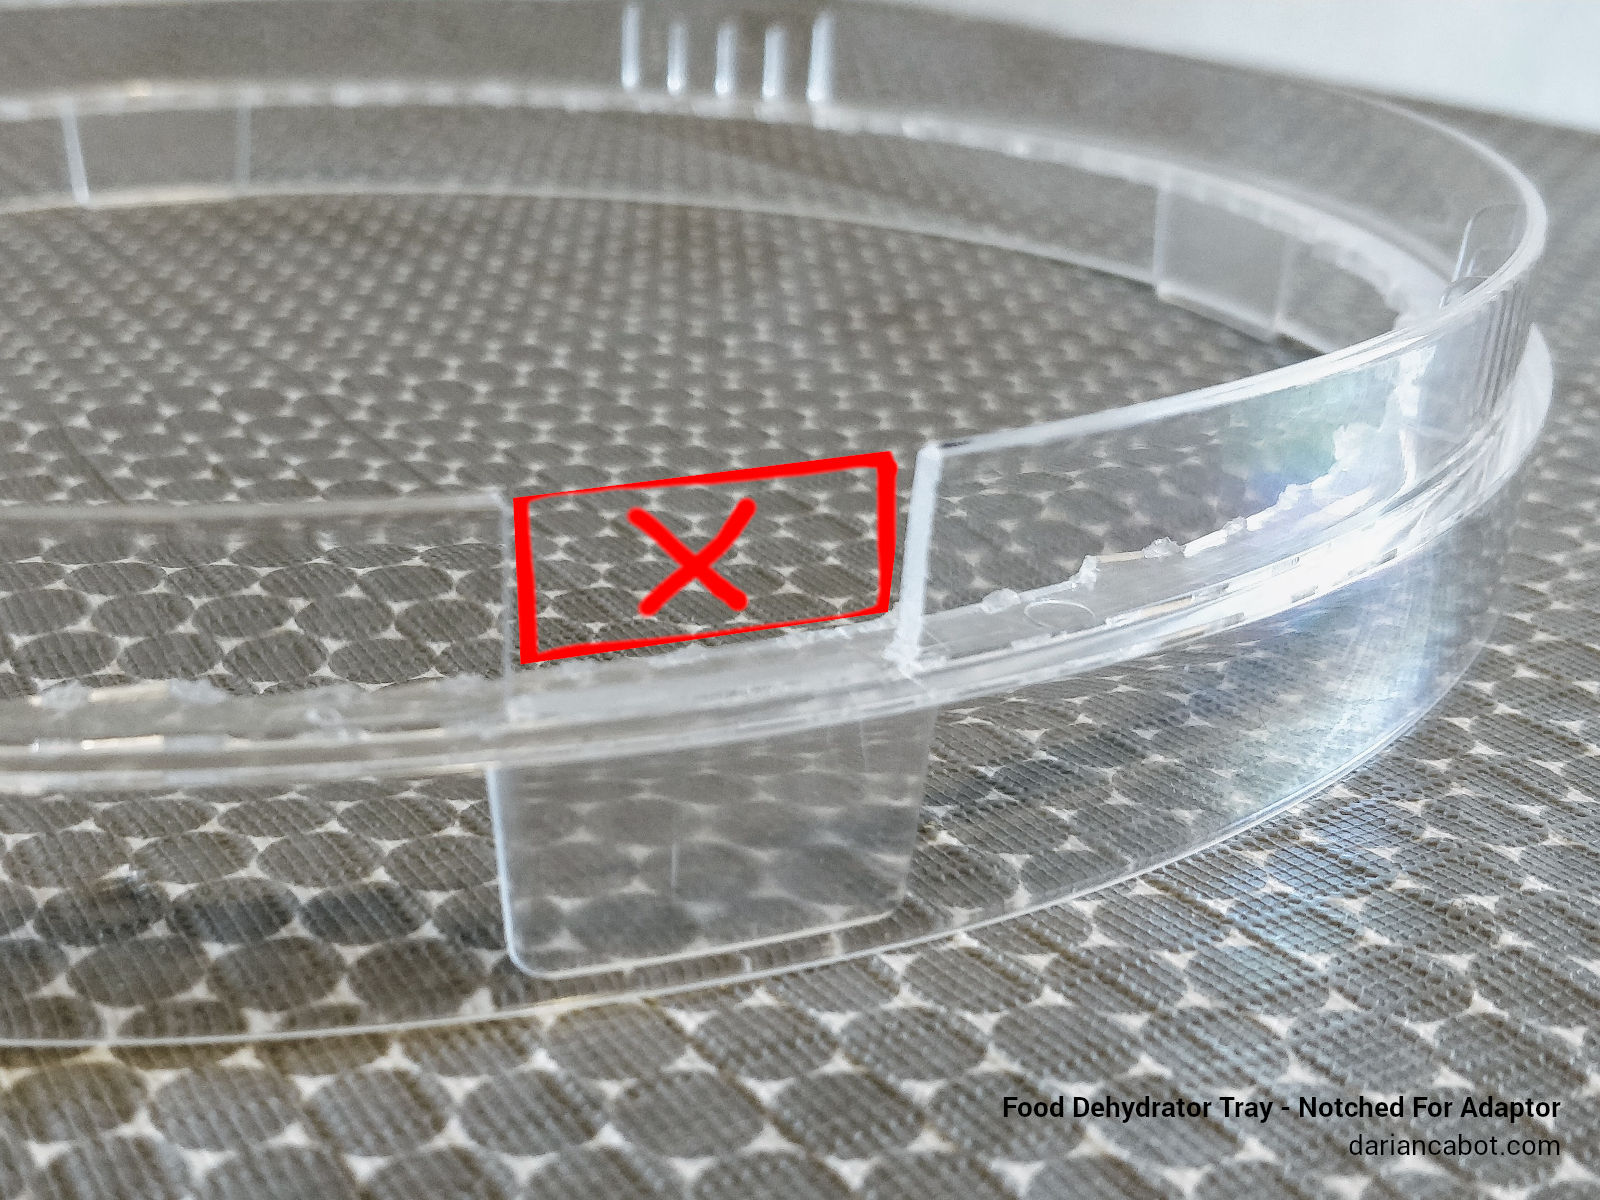
the 2 remaining trays will need the centre mesh cut out of them. Use some strong side-cutters or a Dremel to cut the mesh out so you are left with just the tray’s outer rings.
Step 3 – Fit the PC4-M10 fitting to the adaptor
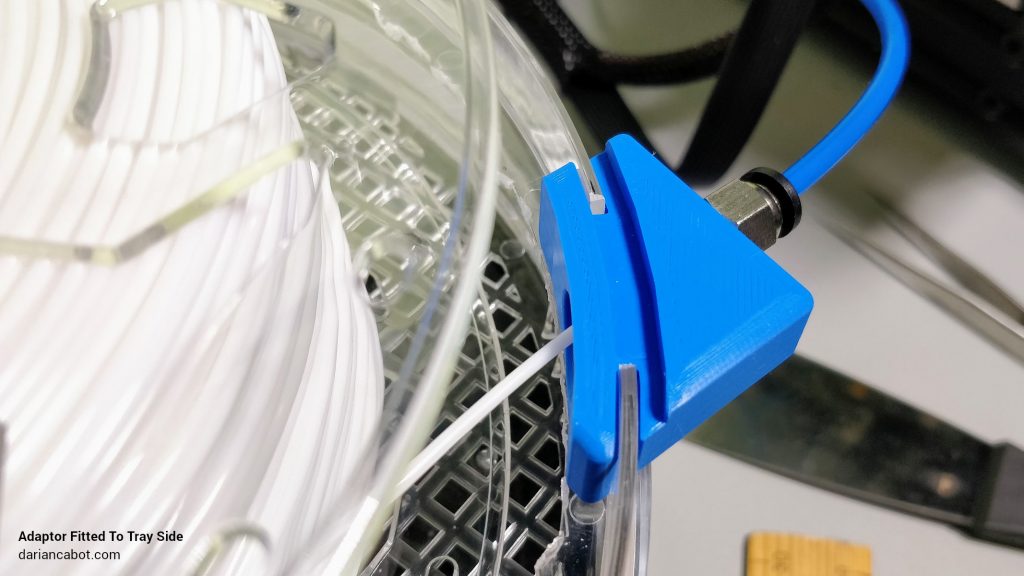
The PC4-M10 fitting is obviously M10 (metric 10mm diameter). The 3D printed adaptor has a 9.5mm diameter hole for the fitting to screw in securely. You may need a wrench/spanner. The PTFE tube can then be inserted into the fitting – push it through so that it’s flush with the other side.
Step 4 – Mount the adaptor to the dryer
Take one of the tray rings and file a 25x13mm notch on the side from the top, as shown…
Step 5 – Insert filament and connect to 3D printer
The adaptor can now be slid in to the notch from the top…

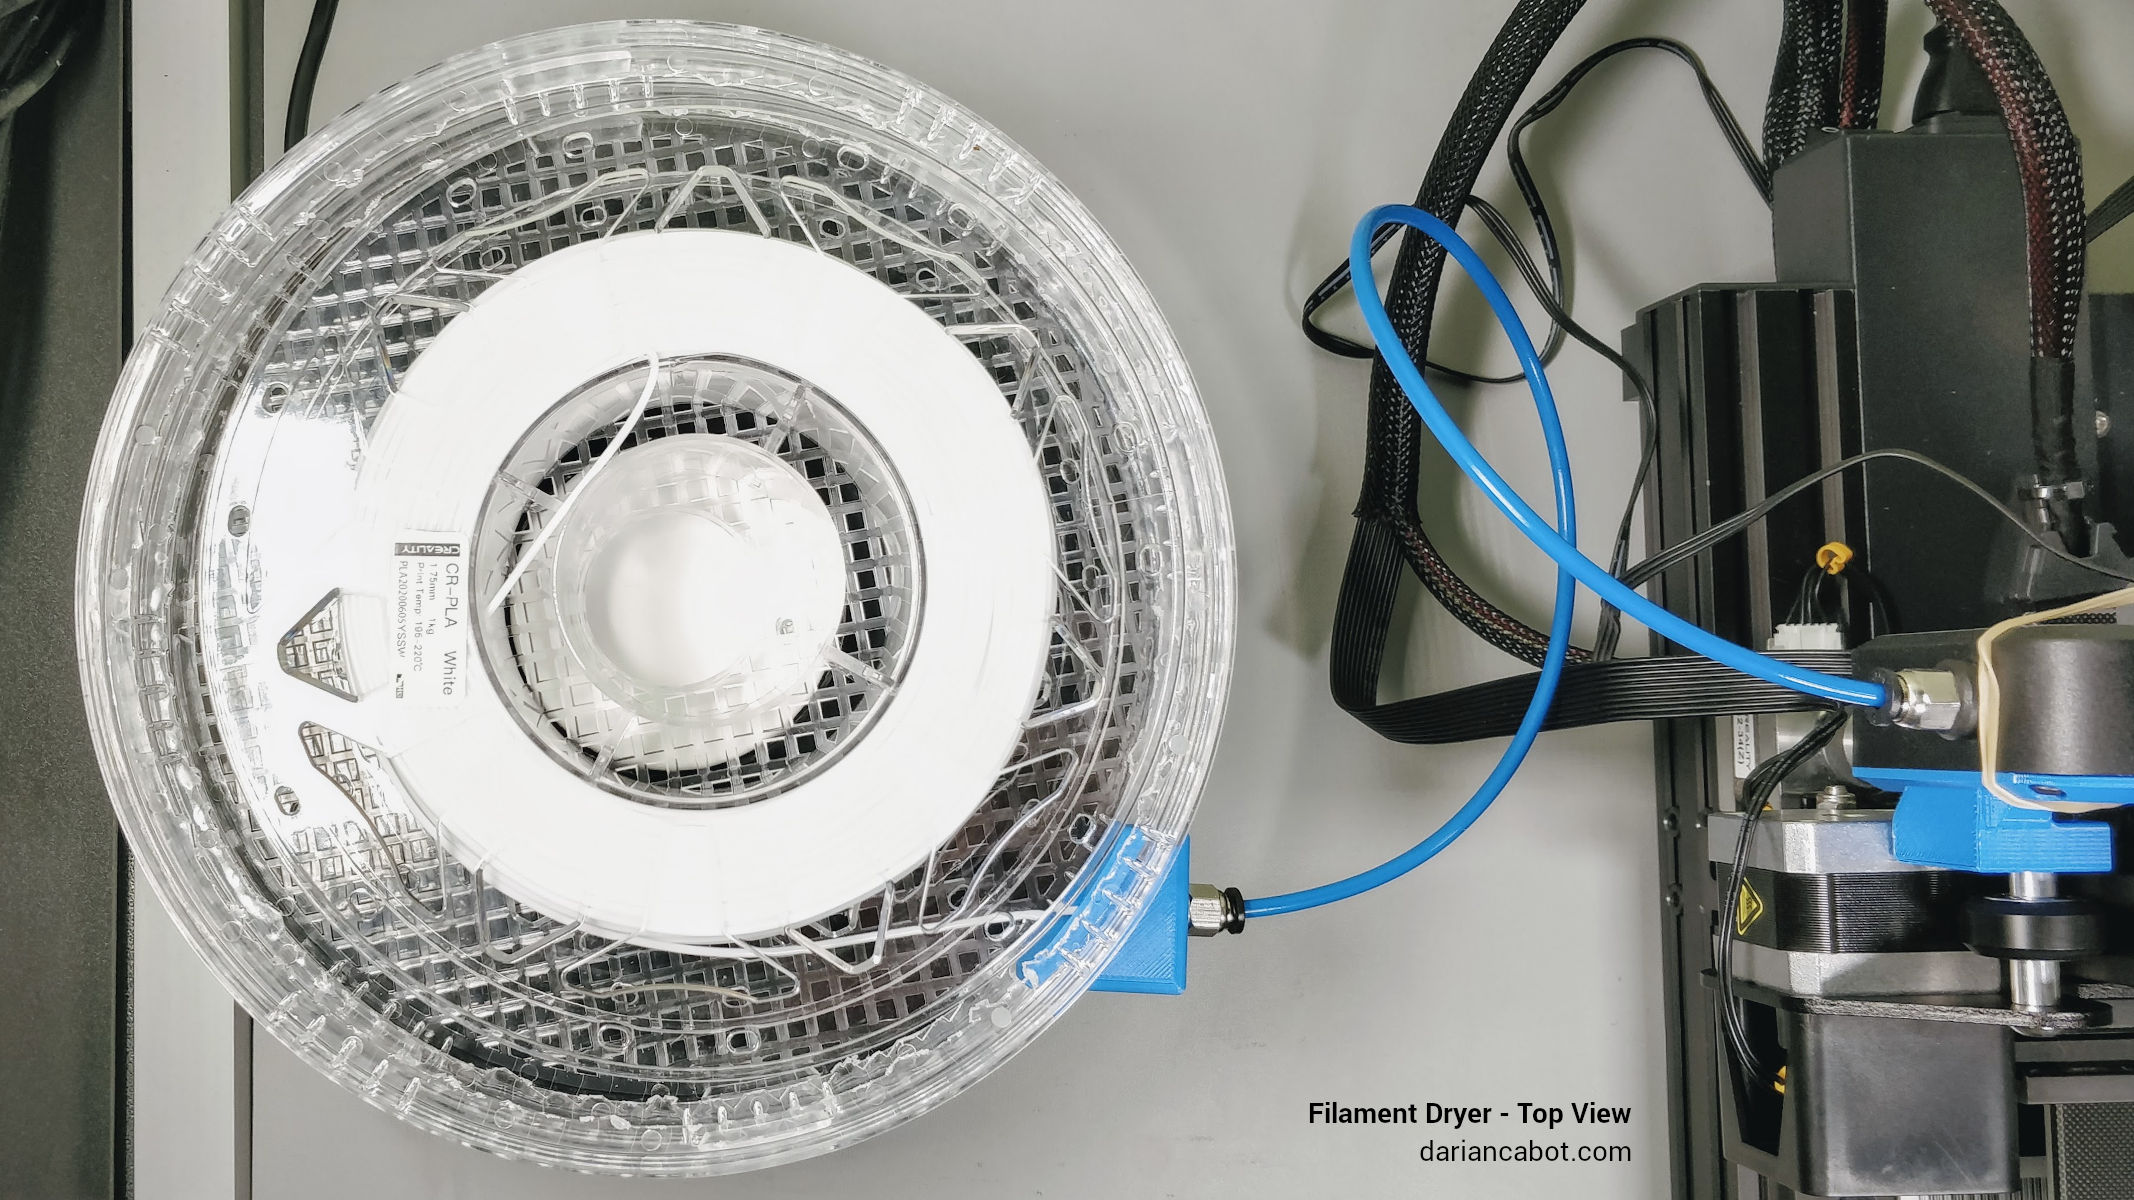
The dehydrator trays should be stacked as follows (top to bottom):
- Lid
- Tray ring – mesh cut-out
- Tray ring – notched with this 3D printed adaptor installed
- Tray ring – unmodified (filament spool will sit on this)
- Food dehydrator base
Connect the PTFE bowden tube to your printer’s extruder. Here’s a view from the top (lid removed from dryer for this photo).
Ready to print!
Ensure that the filament spool can turn freely and isn’t hitting anything.
Set the dehydrator to it’s lowest temperature setting, and turn it on. After a few minutes, turn it to the middle setting. I measured this at 45~50°C which has given me good results with PLA – you may wish to check this with a thermometer on your setup or research other temperatures if you’re using different types of filament.
With that all put together, it’s ready to go! 🙂
3 comments
Hi Darian,
Thanks for posting this blog! This looks very interesting. I have an Ender 3 Pro so I’m not so familiar with the Ender 3 V2. I did take a close look at Ender 3 V2 pictures online and I can’t quite figure out how you attached the PTFE tube to the extruder on the Ender 3 V2 (?)
From the pictures I found online, it looks the same as the Ender 3 Pro with just a hole entering the extruder but with no PTFE connection.
Would you mind detailing how you connect the PTFE tupe to the extruder?
Thanks!
Hi Peter,
I have a BTT Smart Filament Sensor immediately before the filament feeder which may make the connection a little more convenient (it has tube fittings that I can connect to).
So my setup is as follows: Filament drier – PTFE tube – BTT filament sensor – Ender filament feeder – PTFE tube – Extruder.
If you don’t have a filament sensor, you can go straight into the filament feeder from the drier with a PTFE tube. Perhaps just print a little bracket to hold to tube in place?
Cheers
[…] DIY 3D printing filament dryer – Darian Cabot […]