Automatically connect to VPN at Windows startup

I use VPN for work quite often, and lately more often than not. I found that some programs that load on Windows startup and rely on this connectivity were trying to connect before I had a chance to establish a VPN connection. I needed a way to connect to VPN as soon as possible, even before I logged in to Windows. The answer is to use the RASPHONE and RASDIAL commands that I found already installed and available in Windows 7 Ultimate. This method should also work for Windows XP and Vista.
Just a side note, the “RAS” prefix stands for Remote Access Services and there are a heap of commands in the same RAS suite that I won’t show here, but you can Google. 😉
The rasphone command allows you to create and save connections in an address book. You could potentially use just this, but it will always prompt the user to initiate the connection (username and password dialogue). If you’re looking to fully automate the connection process so it can happen unattended, you can utilise the rasdial command. There are three steps to achieve this:
Step 1: Create a new network connection
Note: If you already have a VPN connection configured that you wish to use, you can skip this step.
Type “rasphone” in the Windows Run dialogue (Win + R). To bring up the network connections address book…
This will show the configured network connections in Windows. Click “New” and then select “Workplace network” for a VPN connection and follow the prompts. Once this is complete the connection will appear in the network connections address book and the Windows Network and Sharing Center. You can test the connection by clicking “Connect…”. You’ll see the following connection dialogue…
This is all well and good, but if we’re going to make this connection at startup this dialogue will soon become an annoyance. We can avoid this by using the rasdial command.
Step 2: Using RASDIAL
To demostrate the usage of rasdial, we’ll use a command prompt by entering “cmd” in the Windows Run dialogue. To use rasdial you’ll need to parse parameters using command line arguements in the following format:
rasdial [connection name] [username] [password]
So for our test we would type:
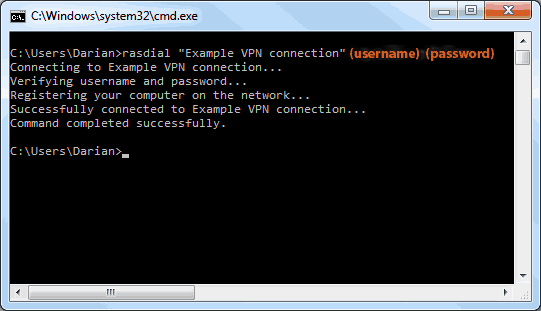
rasdial "Example VPN connection" username password
You should get the following output upon a successful connection…
Notice that at no time we’re you prompted with the Connection dialogue – nice! 🙂 Now all we need to do is schedule this command to run at Windows startup.
Step 3: Scheduling RASDIAL at startup
First, we need to open the Windows Task Scheduler. Open a run dialogue, type “taskschd.msc”, and click OK. From the “Action” menu, select “Create task…”.
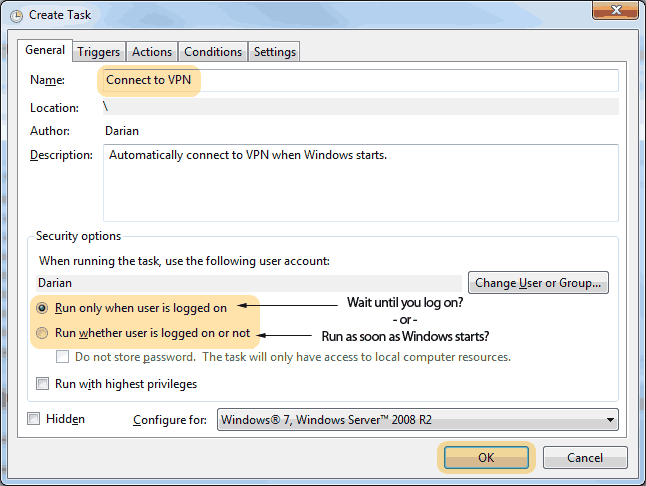
On the “General” tab, type a name for the task and select whether to run only when you’re logged in, or even when you’re logged out (i.e. as soon as Windows starts).
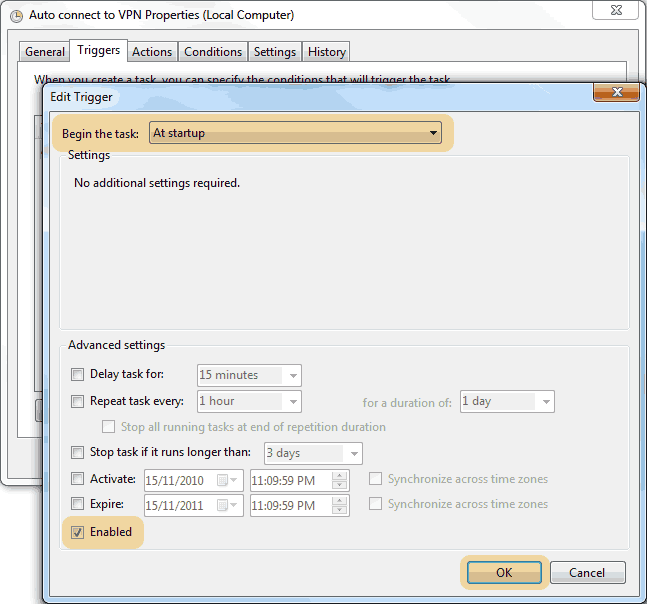
Switch to the “Triggers” tab and add a new trigger. This is the event Windows will watch for to start the VPN connection. Set “Begin the task:” to “At Startup” and ensure “Enabled” is checked.
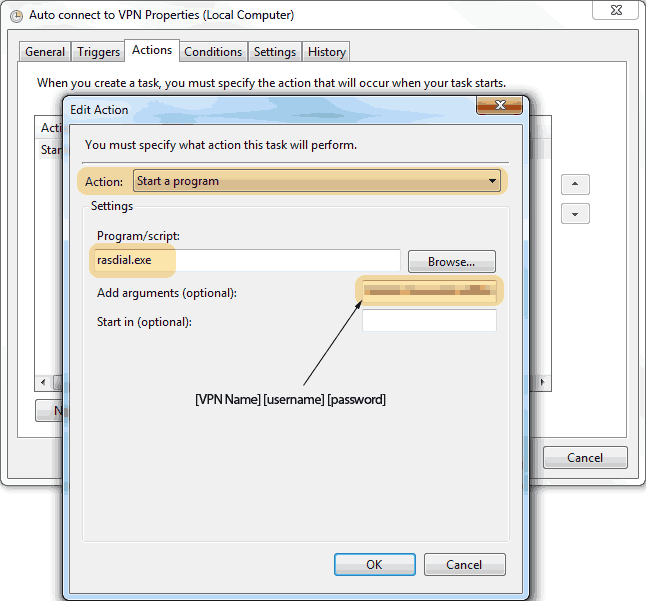
Finally switch to the “Actions” tab to give the task something to do! Set “Action:” to “Start a program”. We’ll be using the rasdial command from step 2, so in “Program/script:” type “rasdial.exe” and in “Add arguements” type the VPN connection name, the username, and the password (this is the same as the arguements in step 2). Click OK and you’re new task is created and ready to go. 🙂
Now you can test the task by navigating to the “Task Scheduler Library”. Select your task from the list and click Run. Next time to start your PC you should have your VPN connection up and ready to roll automatically.
Further reading
RASPHONE and RASDIAL: Tips and Differences – Microsoft Support


